
H3D Tutorials
Popular Tutorials


Tutorials
-
![Subdivision Modeling of a Human]() Subdivision modeling is a procedure for creating smooth mod- els while keeping the total polygon count at a low level. Point counts are small so that the sculpting process is less confusing. New software developments, such as those in Maya and XSI, offer more robust subdivision modeling tools, a...
Subdivision modeling is a procedure for creating smooth mod- els while keeping the total polygon count at a low level. Point counts are small so that the sculpting process is less confusing. New software developments, such as those in Maya and XSI, offer more robust subdivision modeling tools, a... -
![Automatic Cleanplate Generation]() Automatic Cleanplate Generation - Tutorial by Florian Schr�der This tutorial covers the process of generating a cleanplate for a green/bluescreen-shot in the compositing software Shake. A cleanplate (only the stage, without any actor in front) helps you to get rid of bumps and uneven l...
Automatic Cleanplate Generation - Tutorial by Florian Schr�der This tutorial covers the process of generating a cleanplate for a green/bluescreen-shot in the compositing software Shake. A cleanplate (only the stage, without any actor in front) helps you to get rid of bumps and uneven l... -
![Seamless texturing: Part 3 of Creating a realistic looking turtle]() This time I will first explain a few useful tricks to seamless texture your models and then we will see how to do to make the texture maps look realistic. Since I will refer to examples and tecniques I explained in the other two tutorials, I suggest you to take a look at them). Well, let�s ...
This time I will first explain a few useful tricks to seamless texture your models and then we will see how to do to make the texture maps look realistic. Since I will refer to examples and tecniques I explained in the other two tutorials, I suggest you to take a look at them). Well, let�s ... -
![Compositing Backlighting]() Step 1: First of all, the composition will need an alpha channel or a key. Since Hank was done in 3D, the raw untouched render and the alpha channel are easily separated by rendering with an alpha (RGBA). This could have been footage from a camera as well with the alpha obtained by keying out th...
Step 1: First of all, the composition will need an alpha channel or a key. Since Hank was done in 3D, the raw untouched render and the alpha channel are easily separated by rendering with an alpha (RGBA). This could have been footage from a camera as well with the alpha obtained by keying out th... -
![Expressing Emotion]() Chapter 14 Facial Animation Expressing Emotion Copyright 1999 Peter Ratner (Excerpt from Mastering 3D Animation) When animating emotion, a reliance on only facial animation will have little substance if it is not combined with the relevant posture of the body. The attitude of the body should...
Chapter 14 Facial Animation Expressing Emotion Copyright 1999 Peter Ratner (Excerpt from Mastering 3D Animation) When animating emotion, a reliance on only facial animation will have little substance if it is not combined with the relevant posture of the body. The attitude of the body should... -
![Faking ray-traced shadows with depth-map shadows i]() To produce realistic 'soft shadows' in Maya, you have two solutions. # Ray-traced shadows (with radius > 0); it works pretty well, but the higher rays samples (at low value, you get a noisy shadow), the longer it'll take to compute an image. # Depth-map shadows, which is the quickes...
To produce realistic 'soft shadows' in Maya, you have two solutions. # Ray-traced shadows (with radius > 0); it works pretty well, but the higher rays samples (at low value, you get a noisy shadow), the longer it'll take to compute an image. # Depth-map shadows, which is the quickes... -
![Using Ribbox in MTOR]() I this tut I will show you a technique for reducing rendering times in MtoR/RenderMan. 1 - First we setup a scene. For this example i use a fairly simple one but we supose that is a huge city landscape. 2 - Let see what we got. If you have it in your shelf, Hit the RenderMan Render button ab...
I this tut I will show you a technique for reducing rendering times in MtoR/RenderMan. 1 - First we setup a scene. For this example i use a fairly simple one but we supose that is a huge city landscape. 2 - Let see what we got. If you have it in your shelf, Hit the RenderMan Render button ab... -
![Satin Material]() Satin Material By Neil Blevins July 15th 2004 This is a quick tutorial discussing a satin shader I made in brazil, and some of the thought behind making it. While the example is brazil rendered, you can use pretty much any renderer / 3d app to get a similar effect. Someone came on t...
Satin Material By Neil Blevins July 15th 2004 This is a quick tutorial discussing a satin shader I made in brazil, and some of the thought behind making it. While the example is brazil rendered, you can use pretty much any renderer / 3d app to get a similar effect. Someone came on t... -
![How to paint on Subdivision Surface inside Maya]() I wrote this tutorial just to share with the maya community of this web site this trick I found to resolve a big problem, (at least for mine): how to paint on Subdivision Surface inside Maya. 1. This is an head I modelled for an incoming italian production of the Pool studio in Rome 2. Front ...
I wrote this tutorial just to share with the maya community of this web site this trick I found to resolve a big problem, (at least for mine): how to paint on Subdivision Surface inside Maya. 1. This is an head I modelled for an incoming italian production of the Pool studio in Rome 2. Front ... -
![Realistic Snow]() 1. Create a NURBS surface and deform it a bit to get a nice-looking bumpy terrain. Create a camera 2. Open the Hypershader. Create a Blinn node and edit it as shown below: I highlighted in red the attributes that need to be edited. Don't forget the slight blueish Ambience, because sno...
1. Create a NURBS surface and deform it a bit to get a nice-looking bumpy terrain. Create a camera 2. Open the Hypershader. Create a Blinn node and edit it as shown below: I highlighted in red the attributes that need to be edited. Don't forget the slight blueish Ambience, because sno... -
![Animated Shaders with MTOR]() Here is Another Tut for RenderMan via MtoR. This time we're going to animate parameters in the shaders control window. The first time I jump in the MtoR world I was wondering where was the set key buttons or Options, but I didn't find it anywhere so I did a very simple thing : I looked for it in...
Here is Another Tut for RenderMan via MtoR. This time we're going to animate parameters in the shaders control window. The first time I jump in the MtoR world I was wondering where was the set key buttons or Options, but I didn't find it anywhere so I did a very simple thing : I looked for it in... -
![The Cornell Box Simulation: Raiders of the Last Node]() Ok! Recently I bought the Advanced Shading Network Training video Tape from AW This tape hosted by Tom Kluyskens Talk about some advanced shading network and Hidden nodes like distanceBetween or closestPointOnSurface etc... and showed several way to use'em Looking this cool tape an idea comes ...
Ok! Recently I bought the Advanced Shading Network Training video Tape from AW This tape hosted by Tom Kluyskens Talk about some advanced shading network and Hidden nodes like distanceBetween or closestPointOnSurface etc... and showed several way to use'em Looking this cool tape an idea comes ... -
![Shadow Passes with MTOR]() Ok! Another Tut for exploring the RenderMan capabilities via MtoR. This time we're going to work with shadow passes for compositing purpose There are several ways to output a Shadow only pass but i will show you two wich are not covered by the documentation (or maybe I'm blind) 1 - First we ...
Ok! Another Tut for exploring the RenderMan capabilities via MtoR. This time we're going to work with shadow passes for compositing purpose There are several ways to output a Shadow only pass but i will show you two wich are not covered by the documentation (or maybe I'm blind) 1 - First we ... -
![Layered Texture Tutorial]() In this tutorial you will learn how to use the alpha channel of your projected image to "stencil" your image over/under other images on your geometry with the use of a layered shader. first off build your self a nurbs sphere, make it look some thing like this: (You don't have to but it will loo...
In this tutorial you will learn how to use the alpha channel of your projected image to "stencil" your image over/under other images on your geometry with the use of a layered shader. first off build your self a nurbs sphere, make it look some thing like this: (You don't have to but it will loo... -
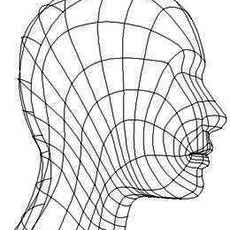
![Modeling a POLYGON Head]() Chapter 7 The Structure of the Head and Features Modeling a POLYGON Head UPDATED Copyright 1999 Peter Ratner (Excerpt from Mastering 3D Animation) There are many approaches to modeling the human head. Most of these methods were designed to accomplish specific goals such as easier sculpting of ...
Chapter 7 The Structure of the Head and Features Modeling a POLYGON Head UPDATED Copyright 1999 Peter Ratner (Excerpt from Mastering 3D Animation) There are many approaches to modeling the human head. Most of these methods were designed to accomplish specific goals such as easier sculpting of ... -
![How to create a Wet Shader in Maya]() created this tutorial because manypeople in computergraphics fret greatly trying to make a wet looking shader. I also doit with a fast rendering shader that is easy and fast to set up,and doesn'tuse any plugins. It also doesn't hinder rendering speedlikea layeredshader can. Let's start. I ...
created this tutorial because manypeople in computergraphics fret greatly trying to make a wet looking shader. I also doit with a fast rendering shader that is easy and fast to set up,and doesn'tuse any plugins. It also doesn't hinder rendering speedlikea layeredshader can. Let's start. I ... -
![Maya to Lightscape]() Grab the melscript hereExpMulOBJ.zip A little introduction With more and more powerful processors becoming available to the average user at affordable prices, radiosity solutions are becoming increasingly popular. Maya, however, does not have a radiosity engine. This tutorial shows how to use ...
Grab the melscript hereExpMulOBJ.zip A little introduction With more and more powerful processors becoming available to the average user at affordable prices, radiosity solutions are becoming increasingly popular. Maya, however, does not have a radiosity engine. This tutorial shows how to use ... -
![How to create a realistic looking turtle - Part 2]() Hi everybody! With the second part of the tutorial (the first one was about the modelling) I will explain how to make a seamless texture map using a marvellous tool that you can find in Maya: the Convert to File Texture (Convert to Solid Texture in Maya 2.5). First of all I want to thank Mass...
Hi everybody! With the second part of the tutorial (the first one was about the modelling) I will explain how to make a seamless texture map using a marvellous tool that you can find in Maya: the Convert to File Texture (Convert to Solid Texture in Maya 2.5). First of all I want to thank Mass... -
![Faking outdoor illumination in maya]() Download Tutorial Scenes faking_outdoor_GI.zip First I have to thank Tom Kluyskens for helping me on the hard part of this tutorial. You'll learn here how to use a very powerful node: the closestPointOnSurface node. Tom has presented a course on that node during the rendering MasterClass at S...
Download Tutorial Scenes faking_outdoor_GI.zip First I have to thank Tom Kluyskens for helping me on the hard part of this tutorial. You'll learn here how to use a very powerful node: the closestPointOnSurface node. Tom has presented a course on that node during the rendering MasterClass at S... -
![Unreal Tournament Skinning]() What you need: 1. Unreal Tournament + latest patches 2. UED (UnrealTournament/system/UnrealED.exe) 3. Photoshop and preferably Painter3D or something like it 4. A texteditor 5. Patience 6. A p3d object model with texture tif for Painter3D (download here tiff ) Also read "Unreal Model Importing: ...
What you need: 1. Unreal Tournament + latest patches 2. UED (UnrealTournament/system/UnrealED.exe) 3. Photoshop and preferably Painter3D or something like it 4. A texteditor 5. Patience 6. A p3d object model with texture tif for Painter3D (download here tiff ) Also read "Unreal Model Importing: ... -
![Unreal Model Importing: The 3ds2unr Converter]() Developed by Legend Entertainment (Creators of Wheel of Time) Programmed by David Townsend townsend@patriot.net Tools you need To create animated models for Unreal mods, you will need the following tools: 1. A good 3D modelling/animation package, such as 3D Studio Max, Lightwave, SoftImage,...
Developed by Legend Entertainment (Creators of Wheel of Time) Programmed by David Townsend townsend@patriot.net Tools you need To create animated models for Unreal mods, you will need the following tools: 1. A good 3D modelling/animation package, such as 3D Studio Max, Lightwave, SoftImage,... -
![How to create a realistic looking turtle - Modelin]() How to create a realistic looking turtle - Modeling part 1 by Denis Zen /artists/2.3d#denis_zen files.zip What follows is the first part of a tutorial which will show you how to model, texture, illuminate and animate a turtle. At the end your turtle should look like the one in the picture below...
How to create a realistic looking turtle - Modeling part 1 by Denis Zen /artists/2.3d#denis_zen files.zip What follows is the first part of a tutorial which will show you how to model, texture, illuminate and animate a turtle. At the end your turtle should look like the one in the picture below... -
![Texture Map NURBS Dragon]() In this section, I would like to use Deep Paint 3D to help me to indicate the location of UV on the NURBS surfaces. But 3D Paint package only recognizes polygons with UV. So, we need to convert NURBS to polygon, then export the polygons to 3D paint program. First, I will create bump map in 3...
In this section, I would like to use Deep Paint 3D to help me to indicate the location of UV on the NURBS surfaces. But 3D Paint package only recognizes polygons with UV. So, we need to convert NURBS to polygon, then export the polygons to 3D paint program. First, I will create bump map in 3... -
![Putting a label on a bottle]() I had to do some experimenting to get this working, so why not share that knowledge with all of you? Modelling Please note that the modelling is very basic and is only used here to support the shading. It is very similar to the glass modelling on the assistant site 1. Draw a curve that will...
I had to do some experimenting to get this working, so why not share that knowledge with all of you? Modelling Please note that the modelling is very basic and is only used here to support the shading. It is very similar to the glass modelling on the assistant site 1. Draw a curve that will... -
![How to render a real volume in Maya]() Maya has some good volume rendering posibilities, but the use of the volume shader is not really documented in the manuals. Each ShadingGroup has an input for a Surface, Volume and Displacement Shader. What Surface and Displacement do is clear. What the volume shader is good for sounds obvious, t...
Maya has some good volume rendering posibilities, but the use of the volume shader is not really documented in the manuals. Each ShadingGroup has an input for a Surface, Volume and Displacement Shader. What Surface and Displacement do is clear. What the volume shader is good for sounds obvious, t...


Page 14 of 17